Quick, down and dirty tutorial on how to downgrade your iOS assuming you have valid SHSH blobs and APTickets. You can read up a little about blobs here.
If you're looking to downgrade on your iPad 2 and above, or iPhone 4S and above, this explains why it's not possible.
Requirements:
With the introduction of iOS 7 and iTunes 11.1.X, iTunes is no longer custom IPSW friendly. So prior to starting, uninstall iTunes 11.1.X+ if you updated to it, remove any default local libraries and caches, and install iTunes 11.0.5 using the below direct links:
Mac OSX || Windows 32 || Windows 64
iPhone 3GS users going to 4.1: If you have an iPhone 3GS (particularly the new bootrom 3GS), and you want to downgrade to an older iOS for the purpose of flashing the iPad Baseband and downgrading it, you can restore to iOS 4.1 WITHOUT SHSH blobs saved for your device. Apple is still signing iOS 4.1 for the 3GS, making blobs unnecessary.
Method One: RedSn0w Only <Windows or Mac OSX>
Step 1: Download the appropriate iOS IPSW that matches your device that you want to downgrade to here. If you have the iPhone 4, make sure you know which band your iPhone is: GSM, World or CDMA.
Step 2: Download RedSn0w for your computer's OS.
Windows Download
Mac OSX Download
Step 3: Run RedSn0w as an administrator (if applicable)
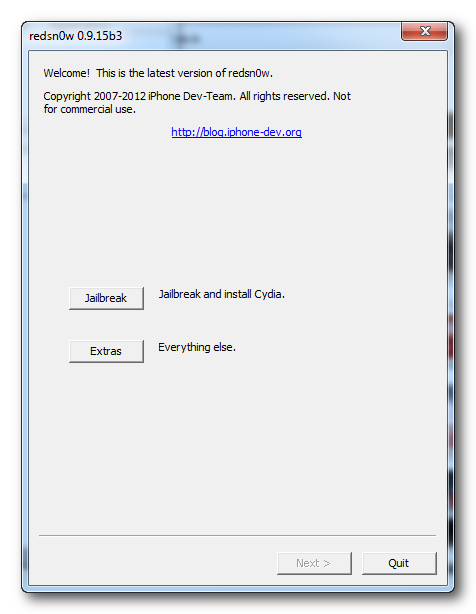
Step 4: Click on Extras
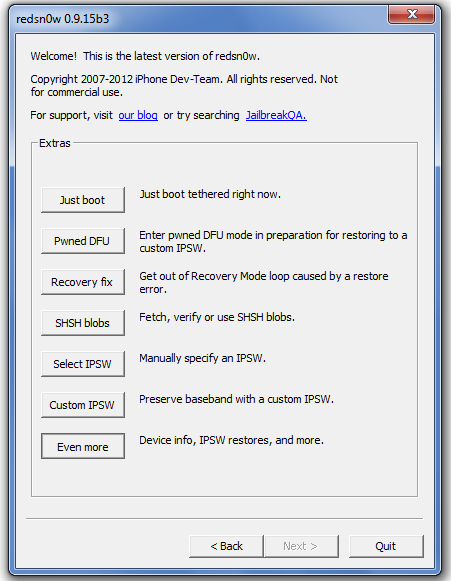
Step 5: Click on Even More
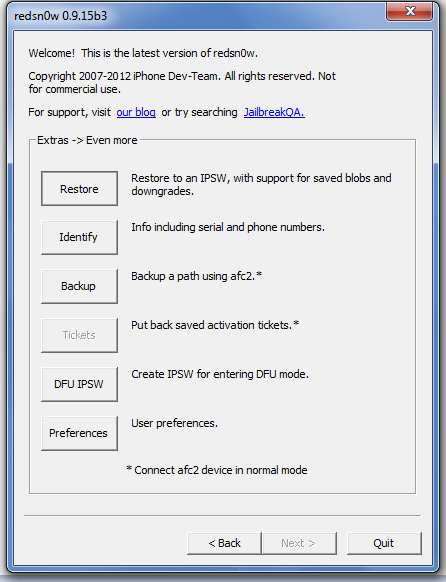
Step 6: Click on Restore

Step 7: Select IPSW and point it to the iOS IPSW that you want to downgrade to, the one that you have valid blobs and APTickets for.

Step 8: For your blobs, select

Step 9: A window should automatically pop-up, if not, click Next and it will pop-up. For 3GS users, it will ask whether or not you want to preserve your device's baseband. If you're relying on UltraSn0w to unlock your device, it's best that you preserve the baseband. For new bootrom users on the iPad Baseband, it's a MUST.
Step 10: Put your device into DFU mode so that RedSn0w can put it into Pwned DFU, allowing RedSn0w to stitch an IPSW with the blobs and restore using that cached IPSW.
Step 11: If your device results in a Recovery Mode screen (Connect to iTunes) after the restore, open up RedSn0w again, go to Extras > Select IPSW. Select the IPSW that you just used in this process, and click on "Recovery Fix". Put your device into DFU mode once again, and let it kick your device out of Recovery Mode.
Method Two: iFaith + iTunes 11.0.5 (Windows-Only)
This method utilizes iFaith and iTunes. With the update of iTunes 11.1 with iOS 7, iTunes is no longer user-friendly when it comes to custom IPSW restoring. Meaning you have to downgrade your version of iTunes to a version of iTunes that is not 11.1, meaning 11.0.5.XXXX and below. Below are the links for iTunes 11.0.5 for Windows.
Windows 32 || Windows 64
To downgrade, first uninstall iTunes 11.1 as you would any other installed application, then delete any locally cached files, particularly the library cache. Backups and such should be kept.
Now grab a copy of iFaith v1.5.9 here.
Step 1- Connect your pre-A5 device and run iFaith as an administrator (if applicable), and click OK in the below screen.

Step 2-
a) If you DO NOT have SHSH blobs on your computer BUT they're on Cydia, you can select "Show Available SHSH on Server" then "Show list of all available SHSH blobs on TSS Server(s)", and either dump all blobs or select the ones that you're looking to use.
Choose a file location and the blobs will be saved there.
Now proceed to 2b below.


b) If you DO have SHSH blobs on your computer already, you can select "Build *signed* IPSW w/ Blobs"
Step 3) Click "Browse for SHSH blobs" and browse towards where you saved your blobs in step 2 or wherever your blobs are.
Note: This is a major checkpoint in the process. If your blobs do NOT have valid APTickets (for iOS 5.X and iOS 6.X downgrade/selective restoration), the process will halt here. If you're getting an issue here, then you cannot restore because your blobs either do not include APTickets or have bad APTickets.

Step 4) Now that iFaith recognizes your SHSH blobs, you'll need to direct it to an IPSW. The nice thing about iFaith is that if you do have have the IPSW, it will download and cache it locally for use. If you have an IPSW already, select the left option. If you do not have an IPSW downloaded already, select the right option. Downloads are all from Apple directly so it's no different from downloading it from our IPSW sticky posted above.

Step 5) iFaith will now verify that the IPSW will work with your IPSW and matches your blobs (if you browse to a pre-downloaded IPSW). Next, select "Build IPSW"

Step 6) Wait for the IPSW to build, this can take a while depending on computer specs. After completion, select OK and place your device into DFU mode. You can place it into DFU mode yourself, or, click "Start" to initiate DFU mode procedure instructions.
iReb will automatically start and place your device into Pwned DFU mode, which is mandatory for installing custom IPSWs.
Step 7) Now launch iTunes (if it doesn't launch automnatically since you turned off the auto-startup). Hold shift and click Restore. Browse the custom IPSW that you've just built and let iTunes do its thing.
Result: Device is downgraded. Restore your backup, set up as new device or restore from iCloud.
Method Three: RedSn0w + iTunes 11.0.5 (Windows or Mac OSX)
As iFaith is Windows-Only, for users that would like the old-fashion custom IPSW method of doing things, below are the steps to create a custom IPSW using RedSn0w.
Step One: Run RedSn0w as an administrator (if applicable)
Step 2: Click on Extras
Step Three:Click on SHSH blobs
Step four: Select Stitch
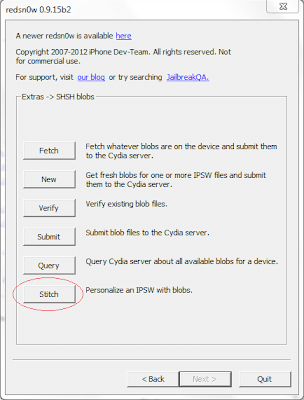
Step Five: Select the IPSW that you're looking to restore to, a.k.a. the iOS IPSW that you'll be providing blobs for.

Step Six: Point RedSn0w to either the locally saved blobs or blobs on Cydia.
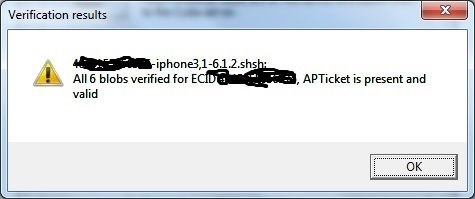
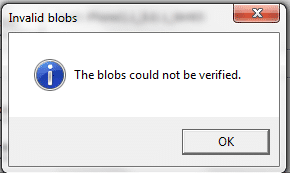
Step Seven: This is the make or break. If your SHSH blobs are not valid (or APTickets), you will receive this. Otherwise, a prompt will show up saying that your IPSW has been stitched successfully and has been saved locally at a given directory.
Step Eight: After the IPSW has been stitched successfully, open up RedSn0w > Extras > Pwned DFU mode. Place your device into DFU mode, and RedSn0w will proceed to place your device into Pwned DFU mode.
Step Nine: Open up iTunes 11.0.5 or below, and shift + click the Restore button, and point it to the customized IPSW that you just made. iTunes will now restore the device.
Note: If your device is in Recovery Mode after the restoration process, simply run RedSn0w > Extras > Recovery Fix, and follow the on-screen instructions and your device will be booted out of Recovery Mode.
-End-
If you're looking to downgrade on your iPad 2 and above, or iPhone 4S and above, this explains why it's not possible.
Requirements:
- Your device must be an iPhone 3G, 3GS, 4, iPad 1 or iPod Touch 4th gen and below (pre-A5).
- You must have SHSH blobs that also contains valid APTickets.
- Your blobs must NOT be shared ones, as they are unique to each device.
- If your device has a broken power and/or sleep button, follow this guide first
- TinyUmbrella
- RedSn0w
- iFaith
With the introduction of iOS 7 and iTunes 11.1.X, iTunes is no longer custom IPSW friendly. So prior to starting, uninstall iTunes 11.1.X+ if you updated to it, remove any default local libraries and caches, and install iTunes 11.0.5 using the below direct links:
Mac OSX || Windows 32 || Windows 64
iPhone 3GS users going to 4.1: If you have an iPhone 3GS (particularly the new bootrom 3GS), and you want to downgrade to an older iOS for the purpose of flashing the iPad Baseband and downgrading it, you can restore to iOS 4.1 WITHOUT SHSH blobs saved for your device. Apple is still signing iOS 4.1 for the 3GS, making blobs unnecessary.
Method One: RedSn0w Only <Windows or Mac OSX>
Step 1: Download the appropriate iOS IPSW that matches your device that you want to downgrade to here. If you have the iPhone 4, make sure you know which band your iPhone is: GSM, World or CDMA.
Step 2: Download RedSn0w for your computer's OS.
Windows Download
Mac OSX Download
Step 3: Run RedSn0w as an administrator (if applicable)
Step 4: Click on Extras
Step 5: Click on Even More
Step 6: Click on Restore
Step 7: Select IPSW and point it to the iOS IPSW that you want to downgrade to, the one that you have valid blobs and APTickets for.
Step 8: For your blobs, select
- Local if your blobs are saved manually onto your computer
- Remote if your blobs are saved and hosted onto Cydia (you can find out if they're on Cydia or not in the home page of Cydia, and scroll down to TSS Center)
Step 9: A window should automatically pop-up, if not, click Next and it will pop-up. For 3GS users, it will ask whether or not you want to preserve your device's baseband. If you're relying on UltraSn0w to unlock your device, it's best that you preserve the baseband. For new bootrom users on the iPad Baseband, it's a MUST.
Step 10: Put your device into DFU mode so that RedSn0w can put it into Pwned DFU, allowing RedSn0w to stitch an IPSW with the blobs and restore using that cached IPSW.
Step 11: If your device results in a Recovery Mode screen (Connect to iTunes) after the restore, open up RedSn0w again, go to Extras > Select IPSW. Select the IPSW that you just used in this process, and click on "Recovery Fix". Put your device into DFU mode once again, and let it kick your device out of Recovery Mode.
Method Two: iFaith + iTunes 11.0.5 (Windows-Only)
This method utilizes iFaith and iTunes. With the update of iTunes 11.1 with iOS 7, iTunes is no longer user-friendly when it comes to custom IPSW restoring. Meaning you have to downgrade your version of iTunes to a version of iTunes that is not 11.1, meaning 11.0.5.XXXX and below. Below are the links for iTunes 11.0.5 for Windows.
Windows 32 || Windows 64
To downgrade, first uninstall iTunes 11.1 as you would any other installed application, then delete any locally cached files, particularly the library cache. Backups and such should be kept.
Now grab a copy of iFaith v1.5.9 here.
Step 1- Connect your pre-A5 device and run iFaith as an administrator (if applicable), and click OK in the below screen.
Step 2-
a) If you DO NOT have SHSH blobs on your computer BUT they're on Cydia, you can select "Show Available SHSH on Server" then "Show list of all available SHSH blobs on TSS Server(s)", and either dump all blobs or select the ones that you're looking to use.
Choose a file location and the blobs will be saved there.
Now proceed to 2b below.
b) If you DO have SHSH blobs on your computer already, you can select "Build *signed* IPSW w/ Blobs"
Step 3) Click "Browse for SHSH blobs" and browse towards where you saved your blobs in step 2 or wherever your blobs are.
Note: This is a major checkpoint in the process. If your blobs do NOT have valid APTickets (for iOS 5.X and iOS 6.X downgrade/selective restoration), the process will halt here. If you're getting an issue here, then you cannot restore because your blobs either do not include APTickets or have bad APTickets.
Step 4) Now that iFaith recognizes your SHSH blobs, you'll need to direct it to an IPSW. The nice thing about iFaith is that if you do have have the IPSW, it will download and cache it locally for use. If you have an IPSW already, select the left option. If you do not have an IPSW downloaded already, select the right option. Downloads are all from Apple directly so it's no different from downloading it from our IPSW sticky posted above.
Step 5) iFaith will now verify that the IPSW will work with your IPSW and matches your blobs (if you browse to a pre-downloaded IPSW). Next, select "Build IPSW"
Step 6) Wait for the IPSW to build, this can take a while depending on computer specs. After completion, select OK and place your device into DFU mode. You can place it into DFU mode yourself, or, click "Start" to initiate DFU mode procedure instructions.
iReb will automatically start and place your device into Pwned DFU mode, which is mandatory for installing custom IPSWs.
Step 7) Now launch iTunes (if it doesn't launch automnatically since you turned off the auto-startup). Hold shift and click Restore. Browse the custom IPSW that you've just built and let iTunes do its thing.
Result: Device is downgraded. Restore your backup, set up as new device or restore from iCloud.
Method Three: RedSn0w + iTunes 11.0.5 (Windows or Mac OSX)
As iFaith is Windows-Only, for users that would like the old-fashion custom IPSW method of doing things, below are the steps to create a custom IPSW using RedSn0w.
Step One: Run RedSn0w as an administrator (if applicable)
Step 2: Click on Extras
Step Three:Click on SHSH blobs
Step four: Select Stitch
Step Five: Select the IPSW that you're looking to restore to, a.k.a. the iOS IPSW that you'll be providing blobs for.
Step Six: Point RedSn0w to either the locally saved blobs or blobs on Cydia.
Step Seven: This is the make or break. If your SHSH blobs are not valid (or APTickets), you will receive this. Otherwise, a prompt will show up saying that your IPSW has been stitched successfully and has been saved locally at a given directory.
Step Eight: After the IPSW has been stitched successfully, open up RedSn0w > Extras > Pwned DFU mode. Place your device into DFU mode, and RedSn0w will proceed to place your device into Pwned DFU mode.
Step Nine: Open up iTunes 11.0.5 or below, and shift + click the Restore button, and point it to the customized IPSW that you just made. iTunes will now restore the device.
Note: If your device is in Recovery Mode after the restoration process, simply run RedSn0w > Extras > Recovery Fix, and follow the on-screen instructions and your device will be booted out of Recovery Mode.
-End-
Last edited: